I'm interning this summer at AMNH and I am working on fruits, vegetables, nuts, grains, textiles, luxury goods, etc. for the Turfan Marketplace scene in the November-opening Silk Road exhibition.
I am mostly making faux fruit look more realistic by sculpting onto them or painting them, or both. I am also sculpting things from scratch as well as making molds and casts of real fruits and veggies.
Here are some examples of the work I am doing.

These bananas are 1/2 finished. They've come in as generic plastic things, and by this point I have sculpted new stems and ends onto them, and airbrushed them a bit. They are missing the top parts in this photo.

These apples have been primed because when we got them they were a silly red color. Soon they will be painted, all the stems removed and replaced with real wood.

Finished apples. Hand painted.


SO MANY APPLES.

1/2 finished figs. These were all the same so I cut them up and put them back together to vary the sizes. Then I sculpted new stems on a few of them. I painted them here, but they are still missing their detail work in this stage.


Closer to being finished, but not quite.

Finished bananas.
In most cases, I am given the species of the fruit, and told to figure out what that looks like, then go from the research I do. Sometimes the designers give me exact reference.
With these apricots, I just had to make them vary in color. The shapes and textures were pretty believable.

Sometimes there is miscommunication, for example, like when the designers said "golden peaches" I found reference online saying that golden peaches were a deep red, when infact they are more yellow than apricots. I will start a new batch of peaches next week, but here are the ones I made. They came a light pink color and I painted them red and yellow.
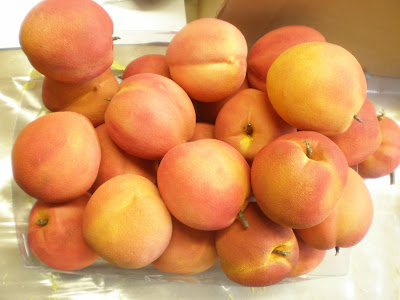
WRONG!
These watermelons are going to be in a lead ice chest that one of the artists is making, and another artist is painting the watermelons. I sculped the stems because the ones that came on them were made of floral tape and wire. In this photo, they are of course, unpainted, but I will photograph them later when they are in the ice chest.

These plums are weird and made of silicone, I just dusted them up to make them look more realistic.

I finally remembered to take a before and after shot.
BEFORE

AFTER

This is seaweed I made from thermoplastic and a heat gun, paint and chalk.


BEFORE

I airbrushed all these, one at a time.
AFTER

And I airbrushed these too.

My next tasks involve sculpting indian gooseberries, and peepul figs, and then casting them so that I only have to sculpt about 5 of each, then painting them.
There's so much more to do!
 Replica claws - painted and ready to glue!
 Finished! Now for the felting.
 I need felt. Rawr.
 Examples of tests - gluing, color matching with airbrushing, creating perfectly-shaped fills.
 Water damage removed, some examples of holes.
 This hole took me a day to fill.
 The result - can you see it? (hint - near the left of the tail)
 Take a closer look.
 These bananas are 1/2 finished. They've come in as generic plastic things, and by this point I have sculpted new stems and ends onto them, and airbrushed them a bit. They are missing the top parts in this photo.
 These apples have been primed because when we got them they were a silly red color. Soon they will be painted, all the stems removed and replaced with real wood.
 Finished apples. Hand painted.
 SO MANY APPLES.
 1/2 finished figs. These were all the same so I cut them up and put them back together to vary the sizes. Then I sculpted new stems on a few of them. I painted them here, but they are still missing their detail work in this stage.
 Closer to being finished, but not quite.
 Finished bananas.
 WRONG!


 This is my antler plaque. It's usually done for smaller sets of antlers that would be considered unnecessary to mount the whole deer. The white is a leather and the black is just braided ropes. There were a variety of colors to choose from but I stuck to pretty contrasty colors.
 I also had to upholster the bottom of my deer mount because it is a wall pedestal. It sits off the wall in a way where you can kind of see underneath it. The white is leather with quilt bedding under it. The t-pins and staples hold it in place and it drums across the form.
 Finished! But upside-down.
 Finished, right side up.
 Brenda's hog - she is going to flesh it and turn the ears tomorrow. (That is hard on a deer, and harder on a hog.) Here's a short video of it:
 We painted turkey heads today. I didn't feel like spending $45 on an artificial head or $75 on a freeze dried head, so I painted an extra one that Chip had in the shop, and I won't get to keep it. I'm not terribly heartbroken.
 Believe it or not, this is actually the colors they are.
 Colors in a bottle.
 Painted, glossed, spotted and finished fish! The bass will belong to Mom and Dad, and the trout is for Mimi and Papa. Enjoy! (Finished meaning they lack bases. But I think I'll do those when I get home from school because it would be dumb to ship a piece of driftwood.)


 My lunch is on the top left. That's the lucky spot. Sometimes it gets moved to the goo-water on the bottom right. This is not ideal.
 Today, Carrie made apple danishes.
 We hit the ears with black and shaped them up.
 We hit the nose with black, too. Then with matte gel all over, and gloss gel in the nostrils to have the nose appear wet.


 Julie and Brenda wait to spray their fish.
 Julie took these of me. I am holding HER fish because mine were inside already. I am laughing because I teased her about how I didn't want to claim them as my own.
 The trout is on the top, the bass below.
 The trout is almost done - it needs a darker line on the top, plus its black spots. You can do those with sharpie or a paintbrush. Airbrush spotting is hard because of those "freak drops" and other accidents.
 In this photo, the bass is completely painted. This eye protect is still on so his nice glass eyes are covered underneath. The trout has some spots but will have much more by tomorrow. In fact, I am painting them for homework. Tomorrow, we will put a high gloss on them that will make them look wet.